Tuesday 29 April 2008

Crosslighting on an overcast day

Leni 
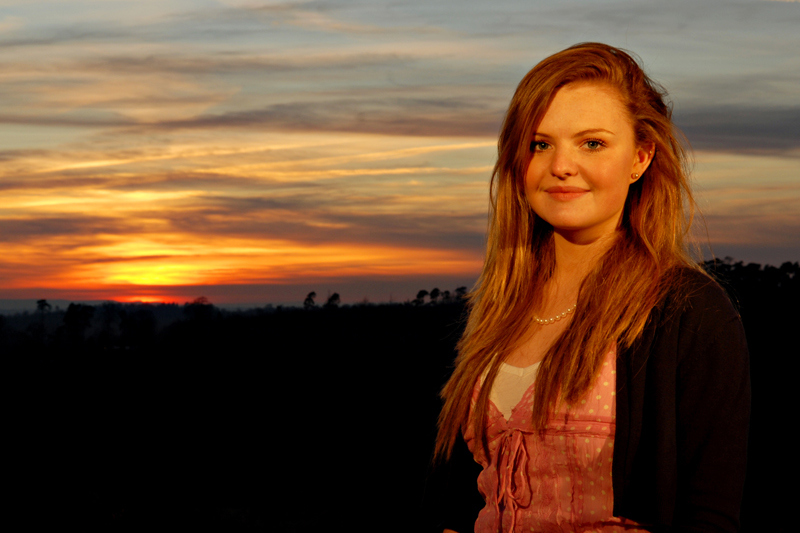
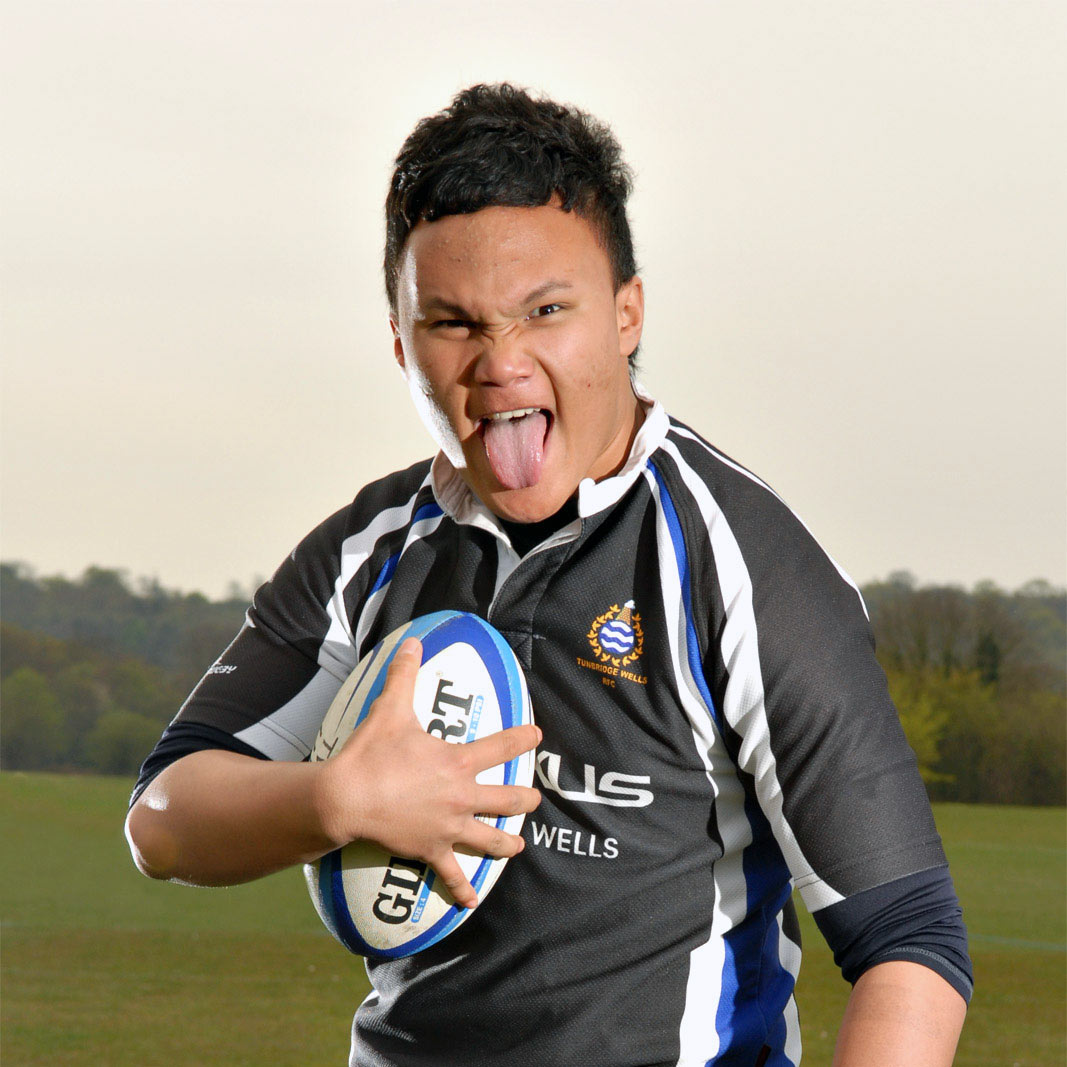
I asked for attitude for this shot! I'd just taken 30 portraits and called Leni back for something a little bit different from the usual smiles. Thanks Leni.

On days when it's sunny I'd use the sun as one 'light' and 1 flash to crosslight it. On a day like this it's one light at the front right, one back left. Start off by taking a shot with no lights. I'll normally do this on the S (shutterspeed) setting with my shutterspeed set at 1/250th which is the fastest speed that my flash units will synch at. Now take your aperture and shutterspeed for that shot and go to M (Manual) enter your shutterspeed as 1/250th but change your aperture by a stop so the next shot will be underexposed. Set your flash units on manual... start with one light at a time. I usually try the front light at 1/4 to start with and adjust it up or down as required. Once it's right I repeat with the back light. Sounds complicated but once you're done it a few times it's a quick process.

If you're shooting sports portraits like this and the players are holding a ball make sure they hold it on the opposite side to the front light. First time I tried this about a year ago I had the ball under the other arm and there was a really obvious dark shadow across the body. They were only test shots at the time but lesson learned.


014555
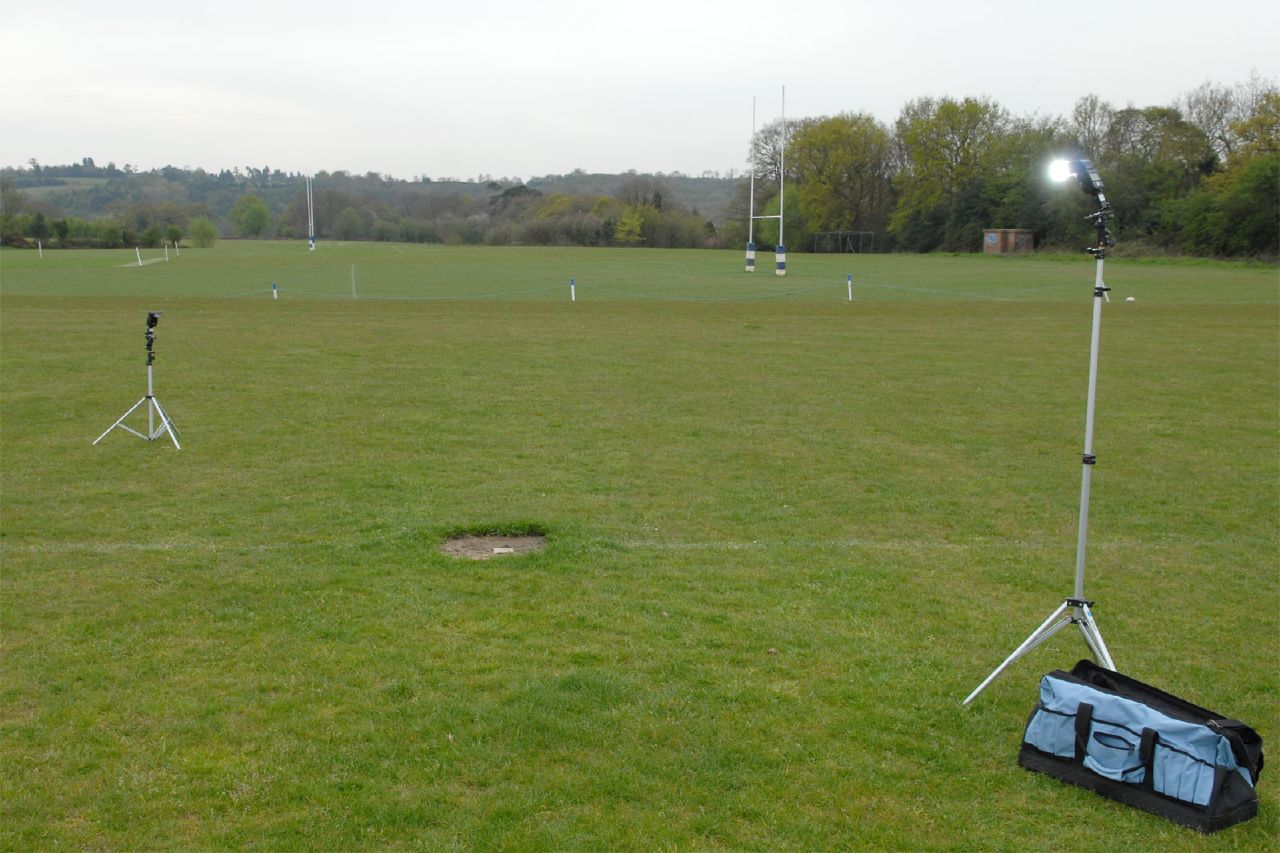
This is the setup. 2 light stands, front one set high, back set low... opposite each other diagonally from the subject.

5 minutes to set up and adjust settings, 5 minutes to photograph 30 lads. This is relatively easy to do and doesn't need to be that expensive if you're just starting out.

Cheap option: couple of 2nd hand light stands or cheap ebay stands, probably around £40 total. 2 flash units - I have 2 that I picked up from ebay as backups for £20 the pair. I only work with manual settings for flash anyway so they're as good as my Nikons for most things. Umbrella adaptors to link your flash to your light stand - £15 for a pair. Ebay remotes, 1 transmitter, 2 receivers - £30. Just over £100 in total.

Professional option: 2 Light stands - £120. 2 sb-800 flash units - £440. Umbrella adaptors to link your flash to your light stand - £15 for a pair. 3 Pocket wizard transeivers - £500. Over £1000 and we haven't started talking about light modifiers yet (umbrellas, softboxes, snoots, grids & gobos!).

You can break the bank buying all the latest kit, but if you're willing to improvise a little it's amazing what you can do with very little. My kit is a mix of both options, but gradually going over to the Pro option. Just waiting on those Pocketwizards now.

Monday 28 April 2008

Party photos

006136 I had someone hold the flash for me on this (high and left), but it would work in a similar way with on cam flash.

ISO 320, F7.1, Shutterspeed anywhere from 1/20th - 2 seconds depending on the effect you want.

The longer the shutterspeed the more light you let in from the background so you can get some pretty funky effects with this approach if you go for a long exposure particularly if there are room lights in the background. The flash will always 'freeze' your subject if you're in a relatively dark environment. This technique is all about livening up the background and giving the shot more life.

This exposure was about 1/2 a second. Enough to leave some movement in there but not too much.

Try it, just make sure you're in a relatively dark room!

Happy Birthday James.

Thursday 24 April 2008

Blogging in Tunbridge Wells

If you enjoy blogs of any sort you should check out Technorati. It's a bloggers search engine. I've got my favourite blogs and I decided to see if I was missing out on any from Tunbridge Wells.

A search on Tunbridge Wells turns up all sorts of things but for me there are three standout blogs, all of which I already knew as it happens, but I'll keep checking to see what else pops up.

Anke Royal Tunbridge Wells is probably the purest 'Tunbridge Wells' blog out there with snapshots of life in town posted on a regular basis. While you're there make sure you click on the 'Eat here' link for Anke's reviews of many local restaurants.

Street photography in Tunbridge Wells is my second choice. Turn up, dive in and set aside a couple of hours to really make the most of this wonderful blog. Great photos. I know I recognised a fair few people there. How about you?

Three beautiful things is written by Clare Grant who in her own words blogs every day to, 'record three things that have given me pleasure'. It's a great concept and a lovely blog. She's also behind Tunbridge Wells tells which greets its readers with, 'Tunbridge Wells has packed the last 400 years with eccentrics and colourful happenings ably recorded by newspapers, novels and diaries. What better way to celebrate 400 years than writing a 400-word account about living, working and playing in the town?'. The blog is a series of short essays by various people giving snapshots of life in Tunbridge Wells. Go and have a look.

I hope you enjoy them as much as I do.

Mix and match and a little photoshop!

003375a

I'm writing this after midnight having just finished processing photos from a dance show I covered last Friday. It's been a long day so I'm going to keep this fairly brief.

This is simply a shot lit by one Studio light through a large softbox, placed very close in and the kick light comes from a flash unit placed on the floor back left fired through a snoot to restrict light spill. The studio light is actually only about 2 feet from her, nicely removed in photoshop and replaced with the black background. The closer the light to your subject the gentler the light looks but that's another post!

There's nothing to stop you from mixing studio lights with flash units. If you're just starting out and you're looking to buy one studio light to start with play with it, but once you're ready to try some 2 light setups use a flash for a while until you're ready to splash out.

Tuesday 22 April 2008

What do you want to see here?

005185a-Teabreak If there's anything in particular that interests you that you'd like to see more of drop me a comment!

Are you here to look at photos? Do you want more informative posts on lighting and general photography tips?

Let me know what you'd like to see so I can target this for you.

Thanks.

Tom

DA23282-10x8Text Taken in the studio quite a while ago, but I love the look on his face so I thought it was worth posting.

Basic composition

001528-rev I'm not generally much of a landscape photographer, but once in a while I see something that I have to photograph. I love this photo. I took it last year on a family break in North Wales.

One of the reasons that this photo works so well is the 'rule of thirds'. If you placed a noughts & crosses grid across it you'd see that it's neatly broken into thirds horizontally with one vertical third in play as well. It's a simple method to improve your photography. Use it a lot to start with, then once you're sick of it teach yourself when to ignore it!


Of course I couldn't walk away from all of that moss without breaking out the lights and grabbing a quick shot of the kids. Once you're familiar with your equipment it really doesn't take a lot longer than just setting the kids in place. Just one flash unit for this one... on the right, held by my wife! From getting the kids out of the car to all done was probably less than 2 minutes.

001540

Crosslighting with the sun

001448 A simple technique that works beautifully is to have one flash on a light stand, in this case to the back right of my daughter and have the sun front left, with both light sources directly facing each other with your subject in the middle. The best examples of this type of photography that I'm familiar with can be found at the State of the Nation Blog. Set your exposure so that the Sun lights your subject nicely, then slowly build up your flash until you get the result you want, making sure that your shutterspeed is below your max sync speed on your camera. If that means nothing to you, but you want to know more, drop me a comment and I'll go into more detail in these posts to explain!

Monday 21 April 2008

Sunsets & Flash

Hattie

Recently went out to Ashdown Forest to take photos of a young couple. It's Callum again from the cricket dive post earlier. We knew before we went that we wanted to get the sunset in there and I decided to light them with a flash on a stand to the left and another on a stand to the right, both with gels on them to match the flash colour to the sunlight. This is a really simple technique once you've tried it a few times and it'll give you good results time and again.

When shooting at sunset start about 40 minutes before sunset and shoot for about 20 minutes after. It's tempting to walk away as the sun goes down, but you will get better light and a prettier background if you wait a little longer. You must keep adjusting your settings as the light changes. I'll cover that in another post.

The technical bit: sb800 w/ cto gel @ 45 deg right. full power @ about 4ft
sb600 w/ cto gel @ 45 deg left. full power @ about 6ft. Started off at F8 1/250th ISO 100 about an hour earlier... Around 1/30th F11 at this point.

Couple portraits 6

While we were waiting for the sunset we tried out a number of different poses and shooting styles. This one was actually Callum's idea. Thanks Callum.

The power of a flash unit

cricket ball flying catch Callum did work experience with me last Summer. It's nice that we;ve kept in touch and done other bits and pieces since. we recently talked about taking some shots to help him promote a cricket tour to Antigua later this year. This is what we came up with. It was a basic net practise and he wanted some shots of the lads just practising. I knew the location and knew I was going to struggle to get what I was being asked for with 'natural' light. I took light stands and flash units anyway and after shooting what I'd been asked for, we agreed to let me try something else.

I set up 2 flash units, 1 directly to the subject's left, 1 to the right. I knew that with natural light 1/250th wouldn't completely freeze motion so reminded of a post at Strobist a few days ago http://strobist.blogspot.com/2008/01/control-your-world-with-ultra-high-sync.html . I dropped the exposure until the background turned black and then added the light. 1/250th F5.6 ISO 200 (ish). This was taken in a normal Gym with normal gym lighting switched on.

cricket batsman

Pretty pleased with them.

Where can you take photos today?

Well it seems that even the Police and PCSOs are confused on this one. I saw a post recently from somone local who had been told to stop taking photographs in the Pantiles by a security guard because their camera looked professional. As it turns out the Pantiles is privately owned (surprised me too) so however frustrating this may be, if you're asked to stop taking photos you need to stop. The same goes for Wellington Rocks. If you're carrying a compact camera you're unlikely to be stopped, but more and more people are carrying dSLRs and the clearer everyone is on the legal aspects of photography the better.

The video here is a little dry in places but it sums it up nicely. Spotted it at http://tunbridgewellsphotography.blogspot.com/ (Well worth a visit if you like street photography). If you're in a public place in the UK, for the most part, you are legally entitled to take photographs (although there will be restrictions on what you can do with them beyond personal use). If you're on private property you don't have that automatic right and you should stop if asked.

Disclaimer: Not a lawyer or claiming to be one so if you're asked to stop taking photos in a public place and you believe you're entitled to be there don't quote me! Stop shooting, research it further and complain later.